Blog
August 1, 2019
If you're looking to improve your web service application, you might want to convert Apache Axis2 to JAX-WS. Using JBoss Tools can help. In this blog, we show a tutorial to convert Axis2 to JAX-WS and get it up and running smoothly (and provide a few notes on what JAX-WS, and JBoss Tools are for those just getting up to speed).
Back to topHow to Convert An Axis2-Based to JAX-WS Web Service
Here's how to convert an Axis2-based web service contained within a web application running on JBoss 7 to a JAX-WS-compliant web service running on the JBossWS framework. If you need a refresher on the basics, you can get answers to a few basic questions at the bottom of this page.
1. Prepare Axis2, JAX-WS, and JBoss Tools
JBoss Tools
For JBoss developers, JBossWS is a great choice for a web services runtime as it is based on the popular, and mature, Apache CXF framework. The Eclipse (Juno) IDE configured with the JBoss Tools 4.0 plugin will be the primary tools used in this effort.
Axis2
To keep it as simple as possible, I will convert an Echo web service that is used in many examples of a POJO-based, Axis2 web service. The creation of the Axis2 web service to be converted is outside the scope of this discussion. However, I will review the project structure of the existing web application-based service.
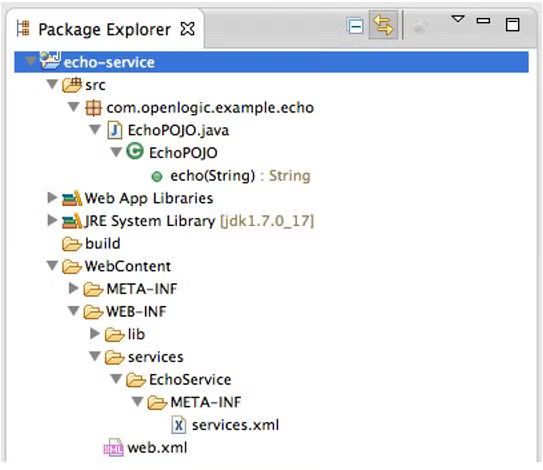
From the above diagram, the key resources used in the Axis2 service implementation are:
- a java class, EchoPOJO, that provides the implementation of the web service
- a services.xml file that Axis2 uses to configure the POJO as a web service
- the web.xml containing the AxisServlet definition
- the lib folder containing the necessary Axis2 libraries
When the above project is packaged and deployed to JBoss 7 on localhost, the web service definition in WSDL format can be found at the following URL:
http://localhost:8080/echo-service/services/EchoService?wsdl
JAX-WS
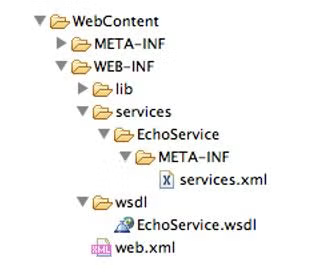
We will need the WSDL from the existing service to generate our new JAX-WS service skeleton. For this, we need to save the wsdl to a file within our Eclipse project structure. Following shows a new folder, WEB-INF/wsdl, with the EchoService.wsdl file placed in that location:
2. Generate JAX-WS Service Using JBoss Tools
Now, we are ready to generate our JAX-WS service using the JBoss Tools wizard which provides a graphical UI around the powerful the Apache CXF wsdl2java command.
To begin, right click on the EchoService.wsdl and choose ‘Web Services -> Generate Java Bean Skeleton’ from the context menu to start the web service generation wizard:
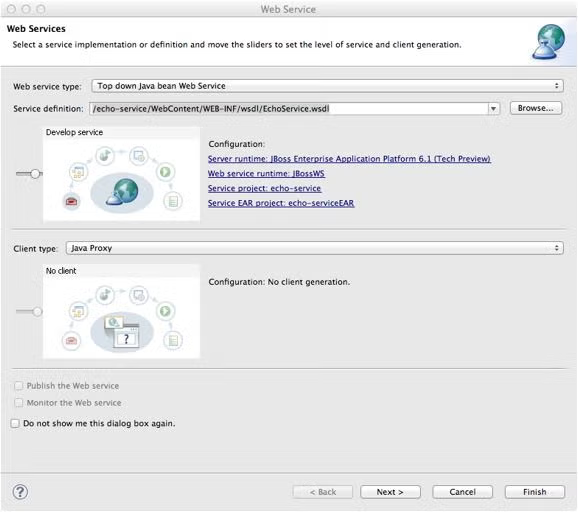
Web service type: leave the default as ‘Top down Java bean Web Service’
Service definition: displays the wsdl that will be used to generate the service Move the top slider all the way to the right so that the top image title changes from ‘Start Service’ to ‘Develop service’.
Configuration: set the service configuration by clicking either the ‘Server runtime:’ or the ‘Web service runtime:’ link to bring up the ‘Service Deployment Configuration’ dialog:
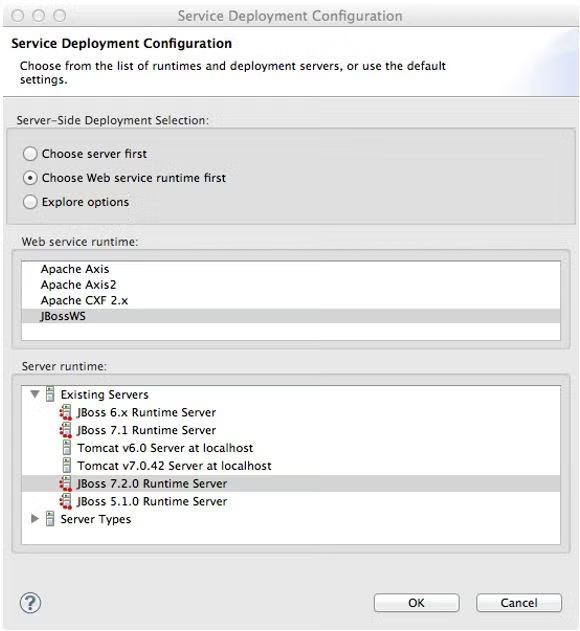
Web service runtime: choose ‘JBossWS’
Server runtime: pick a pre-configured JBoss 7 runtime configuration to which the service will deploy
Click ‘OK’ to return to the Web Service generation wizard and confirm the configuration is correct
Note that the Service EAR project will only be created if the top slider is left at ‘Start Service’.
Click the ‘Next’ button in the wizard to bring up the next dialog page.
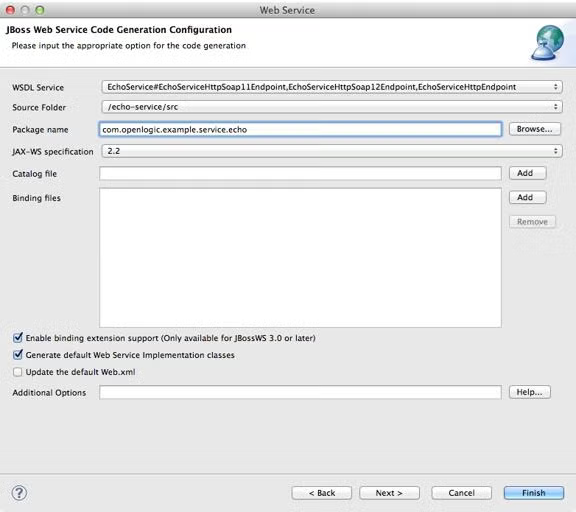
3. Configure Options for The Generated Web Services Code
Here is where we configure options for the generated service code:
- WSDL Service: displays the endpoint that code will be generated against
- Source Folder: displays the source folder where the code will be generated
- Package name: sets the package where the generated code will reside. (I recommend setting a package name to ensure that the generated code will not conflict with any existing classes)
- JAX-WS specification: I recommend setting this to the highest version unless there are existing constraints to which the service must conform to a particular JAX-WS version
- Catalog file: leave blank (not needed for this service)
- Binding files: leave blank (no JAXB binding files are needed for this service)
- Enable binding extension support: leave checked (default)
- Generate default web service implementation classes: leave checked (default)
- Update the default Web.xml: uncheck this option as the JBoss 7 web service deployment scanner will scan and configure the runtime service based on the annotated classes (i.e. @WebService)
Clicking the ‘Next’ button will begin the code generation process. You will see the following text displayed as the code is generated: Generating web service resources…
After the code generation completes, we arrive at the final page in the wizard.
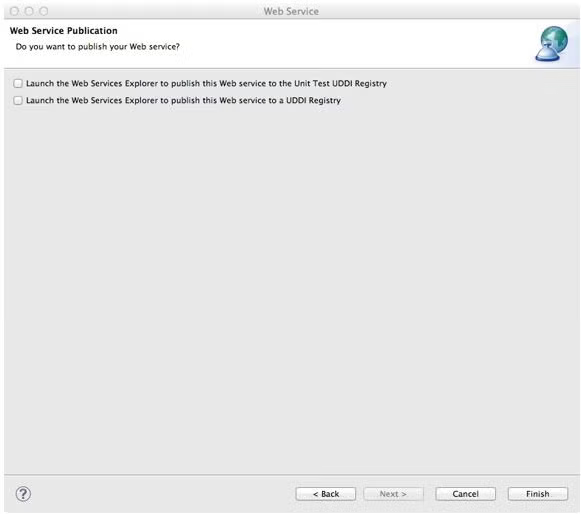
Leave the options unchecked and click the ‘Finish’ button to close the wizard.
Now, let’s take a look at our echo-service project.
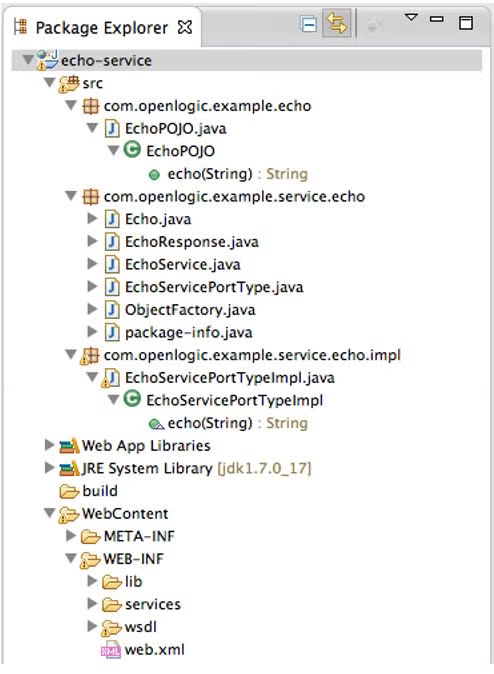
We can see that the ‘com.openlogic.example.service.echo’ package that we specified in the wizard is created. This package holds classes representing the various types and operations found in the wsdl file, an object factory to create them, and a web service client that can be used to access the service (i.e. EchoService).
We also find that a corresponding implementation package, ‘com.openlogic.example.service.echo.impl’ is created that holds the web skeleton implementation of the web service, EchoServicePortTypeImpl, with the same method signatures as the original EchoPOJO class. The web.xml is updated to define EchoServicePortTypeImpl as a servlet.
We can modify EchoServicePortTypeImpl to use delegation pattern to pass the JAX-WS method calls on to the EchoPOJO class, similar to the following:
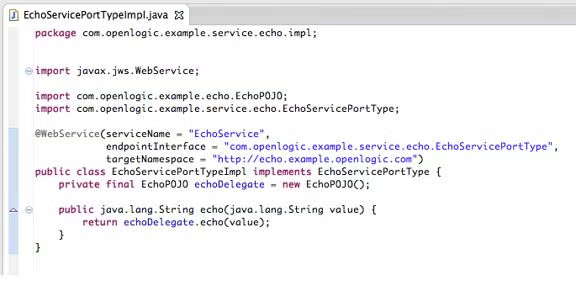
Once the skeleton is updated, we can now remove all of the Axis2-related resources, resulting in a final project structure as follows:
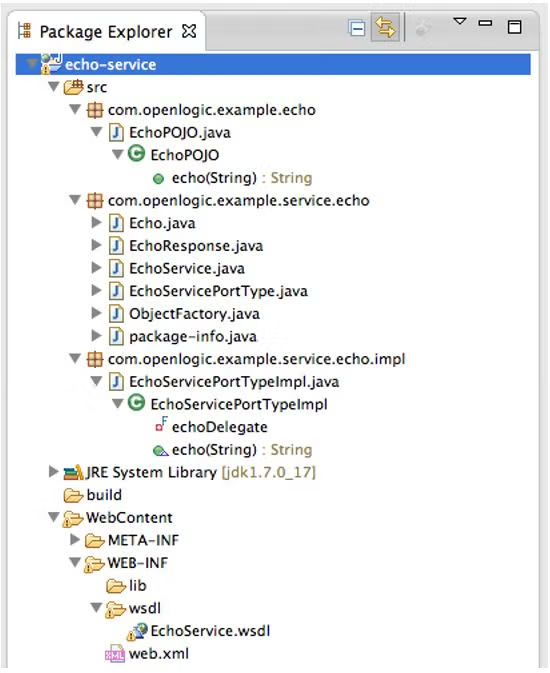
Note that the lib folder is empty and the ‘services’ folder is removed.
Now, when this project is deployed to JBoss, we will find the web service at the following URL:
http://localhost:8080/echo-service/EchoServicePortType?wsdl
You may notice that the new URL is different than the original. This can be easily corrected by modifying the element within the web.xml to match the original service URL, as below:
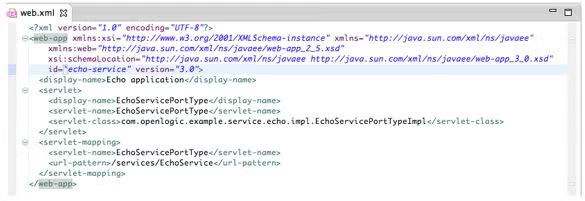
We now have a JAX-WS based web service that implements all of the original functionality and that can be called without making changes to any existing web service clients.
To demonstrate, I used the SoapUI tool to generate a request (Request 1) against the original Axis2 implementation of the Echo service. Next, I made the same request (Request 2) against the new JAX-WS version of the service. The two requests returned similar results.
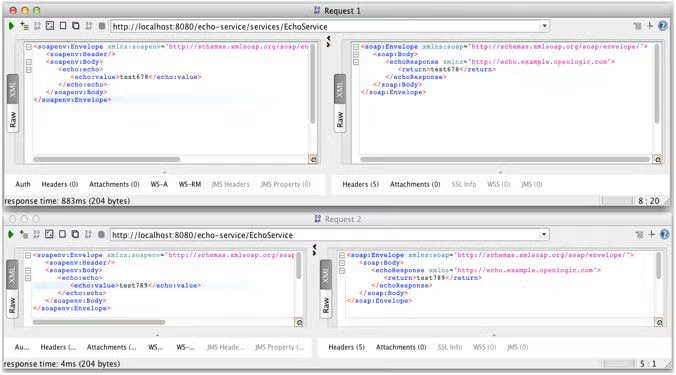
This completes my demonstration of a simple approach to converting your existing Axis2 web services to JBossWS using JBoss Tools in Eclipse. For more complex services, you will likely need to employ JAXB binding files to allow for more fine-grained control over how the code is generated.
Back to topAxis2 and JAX-WS Overview
Just getting familiar with Axis2 or JAX-WS? Here are a few basics to get you started.
What Is Apache Axis2?
Apache Axis2 is a web service client.
What Is JAX-WS?
JAX-WS stands for Java API for XML Services. JAX-WS is an API used for building web services.
What Are JBoss Tools?
Back to topJBoss Tools are Eclipse plug-ins and features used to develop applications.
Get Support For Converting Axis2 to JAX-WS
If you'd like more guidance for your Axis2 to JAX-WS Web Service Conversion or any other open source needs, we'd love to connect with you! You can get in touch with an OpenLogic expert today and get guidance on Axis2 to JAX-WS.
Our experts are knowledgeable in open source middleware solutions. They can help you migrate, connect, and set your apps. And they can provide ongoing support to help you maximize your middleware solutions.
